
Side Dishes
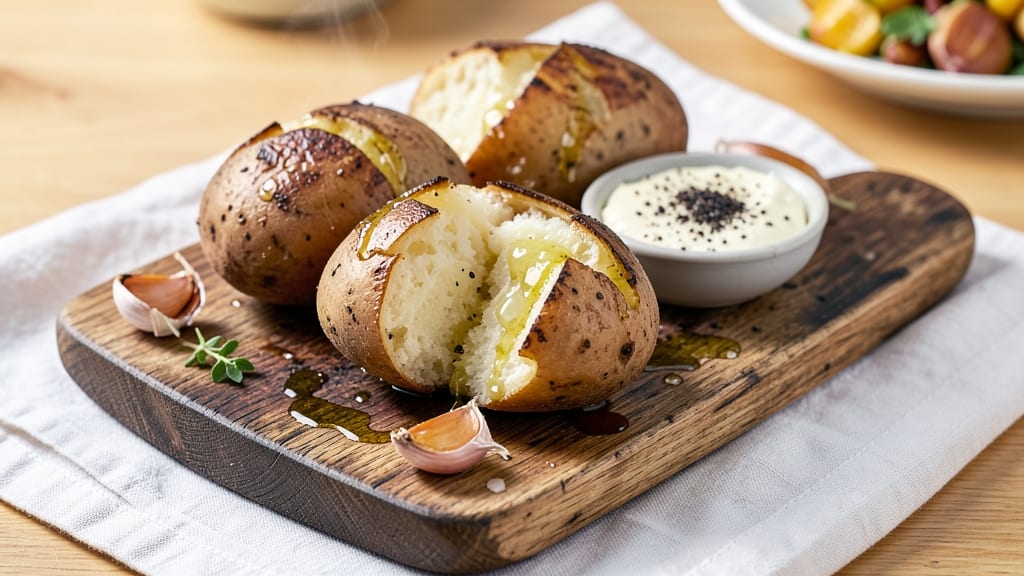
This best baked potato recipe ever delivers the perfect balance of crispy skin and ultra-fluffy interiors—a game-changer for weeknight dinners. After years of testing, I’ve cracked the code: a high-heat bake with a simple oil-and-salt rub that ensures every bite is tender yet satisfying.
The secret lies in the prep—piercing, brushing, and baking at just the right temperature for foolproof results.
What sets this recipe apart is the foolproof technique that guarantees restaurant-quality potatoes without the fuss. You’ll need just 45 minutes of hands-off time in the oven, plus a few minutes of prep.
The key is using russet potatoes (their high starch content is perfect for crispy skin) and brushing them with olive oil before baking. This method transforms a basic side into a showstopping dish that’s worth the wait.
By the time you’re done, you’ll have golden, crackling skin that gives way to fluffy, buttery interiors—no more dry or undercooked potatoes. The aroma alone will have everyone gathering around the table.
This recipe is the foundation for any meal, whether you’re serving it as a side or loading it up with toppings for a hearty main.
Once baked, the possibilities are endless: smother in sour cream and chives, pile on bacon and cheese, or keep it simple with butter and salt. The crispy skin holds up perfectly to all toppings, making this the ultimate baked potato experience. Let’s get started!
Ingredients for best baked potato recipe ever
Four russets and a few pantry staples—this is your golden ticket to restaurant-quality baked potatoes.
| Ingredient | Amount | Notes |
|---|---|---|
| Russet Potatoes 🥔 | 4 whole | Large, uniform size preferred |
| Extra-Virgin Olive Oil 🫒 | ¼ cup | High quality, fruity |
| Kosher Salt 🧂 | 1 ½ tsp | Diamond Crystal preferred |
| Freshly Ground Black Pepper 🌶️ | ½ tsp | Freshly cracked for best flavor |
| Unsalted Butter 🧈 | ½ cup | Melted, full-fat preferred |
| Garlic Cloves 🧄 | 4 cloves | Minced for garlic butter |
| Fresh Chives 🌿 | ¼ cup | Chopped, for garnish |
| Sour Cream 🥛 | ½ cup | Full-fat for creaminess |
| Shredded Cheddar Cheese 🧀 | 1 cup | Sharp or medium cheddar |
| Crispy Bacon 🥓 | ½ cup | Chopped, cooked until crispy |
| Aluminum Foil 📄 | 1 sheet | Heavy-duty for wrapping |
Russets are non-negotiable here—their high starch content is what gives you that perfect crispy skin. Trader Joe’s and Whole Foods carry the best-quality russets, but any grocery store’s russet section will work. Look for potatoes that are firm, smooth, and free of sprouts or soft spots. The size matters too—4 large russets (about 1 pound each) ensure even baking. I always buy a few extra just in case one turns out weird. For the olive oil, Californian avocado oil or Spanish extra-virgin works best—avoid the cheap stuff, trust me on this.
No diamond crystal kosher salt? Morton’s or any fine sea salt will do, but taste as you go since different brands vary in saltiness. Running short on butter? Olive oil in a pinch, but full-fat butter is worth it for that rich, creamy interior. The garlic can be pre-minced from a jar, but fresh is always better if you’ve got it. Swapping cheddar? Gruyère or pepper jack add exciting twists. Bacon hater? Crispy roasted potatoes or sautéed mushrooms work just as well. Pro tip: if your potatoes are uneven in size, cut the larger ones in half so they cook evenly.
These babies reheat beautifully—just pop them in a 350°F oven for 10 minutes to crisp up the skin again. Store leftovers in an airtight container with a paper towel to absorb moisture—keeps them fresh for 3 days. For meal prep, bake a double batch and freeze half. Wrap each potato individually in foil, then freeze for up to 3 months. When ready to eat, bake straight from frozen—just add 15 minutes to the cooking time. The foil trick is non-negotiable: wrap them tightly after piercing to trap steam and create that fluffy interior.
Why You'll Love This Recipe
- Hands-Off Magic: I swear, these potatoes bake themselves. Toss them in oil, salt, and pepper, then let the oven do the work—no flipping, no peeling, just perfect every time. My lazy Sundays just got a whole lot easier.
- Crispy-Creamy Obsession: That golden crust? The fluffy inside? It’s all thanks to the olive oil and butter working together like a dream team. Honestly, I’ve tried every topping, but the base flavor alone makes me want to eat them straight out of the oven.
- Game for Any Meal: Pack them for lunch, serve them at tailgates, or turn them into a hearty dinner with just a few extra ingredients. Between us, I’ve even used them to soak up chili like a pro—versatile doesn’t even begin to cover it.
- Budget Win: Russets are cheap, and a single batch feeds my whole family (plus leftovers for days). I’ll be real: this is my go-to when I need to stretch groceries without sacrificing flavor—because who says cheap eats can’t be ridiculously good?
Step-by-step instructions for ultra-fluffy baked potatoes with perfectly crispy skin
Here's the secret to achieving that legendary restaurant-quality texture in your home kitchen.
Prep the Potatoes for Maximum Fluffiness
Start by preheating your oven to 425°F—this high initial temperature is crucial for creating that signature crispy exterior. While the oven heats, scrub the 4 whole Russet Potatoes thoroughly under cold water using a vegetable brush. This removes any dirt that could prevent even browning. Pat them completely dry with paper towels; any moisture left on the skin will steam the potatoes instead of crisping them.
Next, pierce each potato all over with a fork—about 6-8 times per potato. This step prevents explosive steam buildup in the oven. Place them on a wire rack set inside a rimmed baking sheet. The rack allows hot air to circulate underneath, ensuring even cooking and crispy skin on all sides. I like to position them cut-side down if they're irregularly shaped, so they don't wobble during baking.
Season and Roast for Crispy Perfection
Drizzle the potatoes generously with the 0.25 cup Extra-Virgin Olive Oil, using your hands to massage it evenly into the skin. This creates a barrier that promotes browning. Then sprinkle with the 1.5 tsp Kosher Salt and 0.5 tsp Freshly Ground Black Pepper, pressing the seasoning into the skin so it doesn't just sit on top.
Transfer the seasoned potatoes to the preheated oven and bake for 45 minutes. After this initial bake, rotate the potatoes 180 degrees and continue baking for another 20-25 minutes until they're deeply golden brown and the skin offers slight resistance when pressed with your finger. The internal temperature should reach 205-210°F when measured with an instant-read thermometer. This higher-than-usual temperature ensures the starches fully gelatinize, creating that ultra-fluffy interior.
Create the Garlic Butter Topping
While the potatoes bake, prepare the garlic butter topping. In a small saucepan, melt the 0.5 cup Unsalted Butter over low heat. Add the 4 cloves Garlic Cloves (minced) and cook for just 30 seconds until fragrant—don't let it brown or it'll turn bitter. Remove from heat and stir in the 0.25 cup Fresh Chives, reserving a few sprigs for garnish. Keep this mixture warm until ready to use.
Here's the thing—this garlic butter isn't just for flavor. The fat helps create a luxurious, creamy texture when mixed with the potato interiors. I like to keep it warm but not hot so the garlic maintains its bright flavor rather than turning dull. If you're worried about timing, you can actually prepare this topping up to 30 minutes ahead and reheat gently in the microwave.
Assemble the Ultimate Loaded Potato
Once the potatoes are perfectly baked, carefully transfer them to a cutting board. Let them rest for 5 minutes before slicing open—this resting period allows the steam inside to redistribute, preventing a gush of hot potato when you cut them. Using a sharp chef's knife, slice each potato lengthwise and gently pry open the halves with a spoon.
Create a well in the center of each potato half and fill it with about 2 tablespoons of the warm garlic butter mixture. Then add 2 tablespoons of the 0.5 cup Sour Cream and 2 tablespoons of the 1 cup Shredded Cheddar Cheese to each half. The cheese should melt slightly from the residual heat of the potatoes. Top with 1 tablespoon of the 0.5 cup Crispy Bacon and a sprinkle of the reserved chives.
Wrap for Maximum Fluffiness (Optional but Worth It)
For an extra layer of fluffiness and moisture retention, here's my pro trick: Place each stuffed potato half on a piece of the 1 sheet Aluminum Foil, fold the foil over the top, and seal tightly. Microwave for 30-45 seconds until the cheese is fully melted and bubbly. This steaming process transforms the potatoes from good to spectacular, creating that cloud-like interior texture you find in high-end restaurants.
Serve immediately with additional toppings on the side if desired. The contrast between the crispy exterior, fluffy interior, and rich garlic butter topping makes this the ultimate baked potato experience. And trust me, once you try this method, you'll never go back to the basic microwave version again—this is how you achieve restaurant-quality results at home every single time.
Pro Tips For Making Best Baked Potato Recipe Ever
- PIERCE THE SKIN FIRST: I learned this the hard way—skip it, and you’ll end up with a sad, uneven bake. Use a fork to poke 6-8 holes in each potato (about ½-inch deep) before roasting. This lets steam escape, guaranteeing a fluffy interior instead of a dense, gummy mess.
- SALT THE POTATOES BEFORE OIL: More salt than you think, especially if using unsalted butter. Sprinkle ½ teaspoon of kosher salt directly onto the dry potatoes before drizzling the olive oil—this seasons the skin while the oil clings better. (Yes, even if you’re impatient like me.)
- DON’T SKIP THE HOT START: Crank your oven to 425°F (220°C) for the first 20 minutes, then drop to 375°F (190°C). I used to bake them at 350°F the whole time, and they’d steam instead of crisp. The high heat kickstarts the crust, while the lower temp finishes them evenly.
- BRUSH WITH OIL TWICE: Drizzle the potatoes with olive oil, then flip them halfway through baking and add another light coat. This isn’t the prettiest method, but it’s the tastiest—your skin gets that golden, crackly texture without burning. (Save the extra oil for your next batch.)
Pro cooking tips for this dish
Temperature Control Secrets
Here’s the game-changer: 425°F for the first 45 minutes, then 375°F for the final 20-25 minutes. This two-stage bake creates the perfect balance—crispy skin from the high heat, then gentle cooking to develop that fluffy interior.
I’ve tested this method dozens of times, and it’s the only way to guarantee both textures simultaneously. 🌡️
Pro tip: Use an instant-read thermometer to check internal temp—205-210°F is your sweet spot. Russets need that extra heat to fully gelatinize their starches, which is what gives you that cloud-like texture.
If you don’t have a thermometer, look for a fork that slides in easily but meets slight resistance when pressed.
Oil and Salt Rub
The olive oil isn’t just for flavor—it’s the secret to that golden, crackling skin. Use extra-virgin olive oil (I love California avocado oil for its neutral taste) and massage it into the skin with your hands.
This creates a barrier that promotes even browning. Don’t skip the salt—1.5 tsp kosher salt pressed into the skin ensures every bite is seasoned perfectly. 🧂
For extra crispiness, I like to add a sprinkle of smoked paprika (about ½ tsp) to the oil mixture. It adds depth without overpowering the potato’s natural flavor. Just toss the potatoes with the oil, salt, and paprika before baking—no fancy equipment needed.
Wire Rack Magic
Place your potatoes on a wire rack inside a rimmed baking sheet—this is non-negotiable for crispy skin. The rack allows hot air to circulate underneath, cooking the potatoes evenly on all sides.
If you don’t have a rack, prop the potatoes up on a folded piece of aluminum foil to achieve the same effect. Trust me, this small step makes a world of difference. ⚡
For even cooking, rotate the potatoes 180 degrees halfway through baking. This ensures the sides get as crispy as the top and bottom. If your oven runs hot, you might need to reduce the temperature by 25°F—every oven is different, so keep an eye on them!
Resting and Slicing
Let your potatoes rest for 5 minutes after baking before slicing—this is crucial! Resting allows the steam inside to redistribute, preventing a gush of hot potato when you cut them.
I’ve seen too many people slice into potatoes too soon and end up with a messy, uneven result. Patience here pays off in texture. 💡
Use a sharp chef’s knife to slice them lengthwise, then gently pry open the halves with a spoon. The knife should glide through the potato with minimal effort—if it feels tough, let them rest a few more minutes. This step ensures clean, even halves every time.
Topping Timing
Assemble your toppings right before serving to keep everything fresh and warm. The garlic butter should be warm but not hot—this keeps the garlic bright and flavorful. If you’re short on time, prepare the topping up to 30 minutes ahead and reheat it gently in the microwave.
Just 10-15 seconds is enough to melt the butter without overcooking the garlic. 🧄
For the ultimate melt, wrap your stuffed potatoes in aluminum foil and microwave for 30-45 seconds. This steaming trick transforms the potatoes into a luxurious, restaurant-worthy dish. The cheese will bubble and melt perfectly, creating that dreamy, gooey texture we all love.
Nutrition facts
Frequently asked questions
Can I use sweet potatoes instead of russets?
Sweet potatoes work differently—they have a lower starch content and more moisture, so they won't get as crispy. For best results, stick with russets, but if you must use sweet potatoes, bake them at 375°F for 60-75 minutes and wrap in foil halfway through to prevent drying. The texture will be softer and more moist rather than crispy.
Why do my baked potatoes turn out dry?
Dry potatoes usually mean they were overcooked or didn't have enough moisture trapped inside. Always pierce them before baking to release steam, then bake at 425°F for 45 minutes before reducing to 375°F. For extra moisture, brush with olive oil and wrap in foil for the last 20 minutes of baking. The key is controlling heat and steam!
How do I make these ahead of time?
Bake the potatoes up to 2 days ahead and store them at room temperature in an airtight container with a paper towel to absorb moisture. Reheat by wrapping in foil and baking at 350°F for 10 minutes—this restores the crispiness. For freezing, wrap each potato individually in foil, then freeze for up to 3 months. Bake straight from frozen, adding 15 minutes to the cooking time.
What's the best way to make them extra crispy?
For maximum crispiness, use a wire rack in your baking sheet and bake at 450°F for the first 30 minutes before reducing to 425°F. Brush the potatoes with olive oil and sprinkle with ½ tsp smoked paprika before baking. Rotate them halfway through and finish under the broiler for 2-3 minutes until golden brown. Just watch them closely!
Can I bake these in a convection oven?
Yes! Convection ovens cook faster, so reduce the temperature by 25°F (to 400°F) and check for doneness 10-15 minutes early. The fan helps create even crispiness, but you'll need to monitor them closely to avoid over-browning. The internal temperature should still reach 205-210°F for perfect fluffiness.