Side Dishes
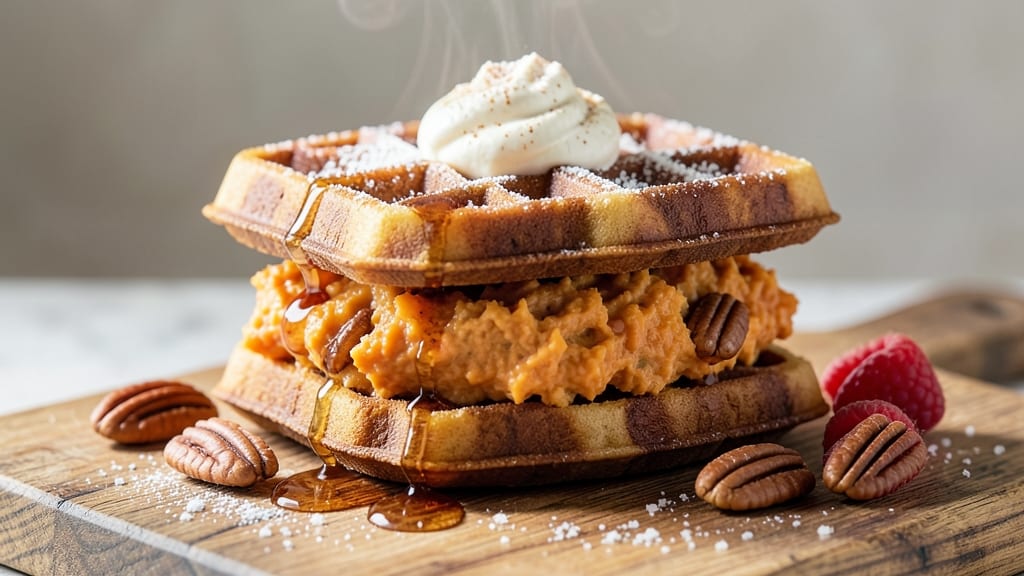
This sweet potato waffle sandwich recipe transforms humble breakfast staples into a hearty, crispy-edged masterpiece that tastes like fall in every bite.
The secret lies in baking sweet potato waffles until golden and crispy at the edges while keeping them tender inside—a texture that holds up perfectly when stacked between buttery toast. I developed this after craving something warm, satisfying, and just different enough to elevate a simple lunch into something special.
The magic happens in the batter, where mashed sweet potato blends with eggs and a touch of cinnamon for warmth, then cooks in a preheated waffle iron until crispy edges form. Assemble with toasted bread, a smear of cream cheese, and optional toppings like crispy bacon or avocado for balance.
What you end up with is a sandwich that's sturdy enough to eat with one hand yet delicate enough to feel like a gourmet creation.
This recipe delivers comfort in the form of warm, spiced waffles that stay crispy even when assembled, making it perfect for meal prep or a quick lunch. The sweet potato adds natural sweetness that pairs beautifully with savory elements, while the cinnamon keeps flavors warm and inviting.
It's the kind of dish that feels indulgent without being heavy—ideal for brunch, lunch, or even a cozy dinner.
Best of all, it's adaptable: swap butter for olive oil, use vegan bread, or add smoked paprika for extra depth. The crispy edges hold together when stacked, ensuring every bite delivers that perfect contrast of textures. Ready to make your next sandwich unforgettable? Let's get started.
Ingredients for sweet potato waffle sandwich
Sweet potatoes, eggs, and cinnamon—these humble staples create crispy-edged waffle magic.
| Ingredient | Amount | Notes |
|---|---|---|
| Medium Sweet Potatoes 🍠 | 2 whole | Peeled and mashed smooth |
| Large Eggs 🥚 | 2 whole | Room temperature for best mixing |
| All-Purpose Flour 🌾 | ½ cup | Sifted for light batter |
| Granulated Sugar 🍚 | 2 tbsp | Adjust to taste if preferred |
| Ground Cinnamon 🌿 | 1 tsp | Warm aromatic touch |
| Salt 🧂 | ½ tsp | Kosher or sea salt |
| Unsalted Butter 🧈 | 2 tbsp | Melted for crispy edges |
| Bread Slices 🍞 | 4 whole | Thick-cut sourdough preferred |
| Cream Cheese 🧀 | 4 oz | Softened for easy spreading |
| Crispy Bacon 🥓 | 4 slices | Optional savory topping |
| Avocado 🥑 | ½ whole | Sliced for creamy contrast |
| Maple Syrup 🍯 | 1 tbsp | Drizzle for extra sweetness |
Sweet potatoes are the star here, so pick firm, vibrant ones—the kind with smooth skin and no soft spots. Trader Joe's and Whole FoodsPenzeys has the best ground cinnamon if you want to splurge, but the regular grocery store stuff is fine for everyday use.
No sourdough bread? Any sturdy bread works—even brioche if you're feeling fancy. The cream cheese should be soft but not melted; Philadelphia brand is my go-to because it spreads smoothly. Out of avocado? Sliced cucumber or extra crispy bacon adds crunch without overpowering. The maple syrup is just for drizzling—substitute honey if you prefer, but keep it to a tablespoon or two. For extra crispiness, brush the waffle iron with a little melted butter before cooking each batch. Trust me on this—it’s a game-changer for texture.
Waffles stay crispy for about 2 hours at room temperature if stacked with parchment paper between them. For longer storage, wrap them tightly in foil and refrigerate for up to 3 days. Reheat in a toaster or air fryer for 2-3 minutes to restore crispiness. The cream cheese and toppings can be prepped ahead—just assemble right before serving. This sandwich is perfect for meal prep: pack the waffles and toppings separately, then assemble when you're ready to eat.
Why You'll Love This Recipe
- No Special Tools Needed: I swear by this recipe because it only requires a waffle iron—no mixer, no fancy gadgets. Just peel, mash, and pour. My 10-year-old can handle the whole thing while I’m still debating what to wear.
- Warm Spice Magic: That cinnamon-sweet potato combo? It’s like autumn in a bite. The sugar caramelizes just enough to make every sandwich taste freshly baked, not cloyingly sweet—honestly, the first time I made it, I ate one straight from the iron.
- Breakfast or Brunch Fix: Between us, I’ve served these as a weekend brunch staple, a quick lunch when I’m running late, and even as dessert (yes, really). The waffle texture holds up to peanut butter, Nutella, or even a sprinkle of flaky salt—no one will guess it’s made from sweet potatoes.
- Budget Breakfast Win: Sweet potatoes last ages in the pantry, eggs are cheap, and flour? You already have it. I make a double batch on Sundays, freeze half, and reheat them in the toaster—no waste, no stress, and my wallet stays happy.
Step-by-step instructions for sweet potato waffle sandwiches
Here's how to create golden, crispy waffle sandwiches with a hearty sweet potato filling—perfect for breakfast or brunch.
Prepare the Sweet Potato Batter
Peel the 2 whole medium sweet potatoes and microwave them for 5-7 minutes until fork-tender. Mash them smooth in a mixing bowl—no lumps! In the same bowl, whisk together the 2 whole large eggs, 0.5 cup all-purpose flour, 2 tablespoons granulated sugar, 1 teaspoon ground cinnamon, and 0.5 teaspoon salt until fully combined.
Melt the 2 tablespoons unsalted butter in a small saucepan over low heat and stir into the batter. The mixture should be thick but pourable—like pancake batter. If it's too stiff, add 1 tablespoon milk or water to loosen it. Let the batter rest for 10 minutes while you preheat your waffle iron to 350°F.
Cook the Waffles to Golden Perfection
Lightly grease the waffle iron with butter or nonstick spray. Pour ½ cup of batter into each section and cook until the waffles are deep golden brown with crispy edges—about 4-5 minutes. You'll make 4 waffles total, so work in batches. Keep them warm in a 200°F oven while you assemble the sandwiches.
Here's the thing—don't overcrowd the waffle iron. If you do, the waffles will steam instead of crisp, and you'll lose that perfect texture. The edges should be crunchy enough to stand up to a sandwich while the inside stays soft and fluffy.
Assemble the Stacked Sandwiches
Spread 1 ounce of softened cream cheese on one side of 2 bread slices (use the thick-cut sourdough if you have it). Place a waffle on top of the cream cheese, then add 2 slices of crispy bacon and ¼ of the sliced avocado to one side. Drizzle with 1 tablespoon maple syrup for extra sweetness.
Top with another waffle, then repeat the layers—cream cheese, bacon, and avocado—on the second waffle. Press gently but firmly to hold everything together. The cream cheese acts as a glue, keeping the sandwich intact even when you take a bite. If you're feeling fancy, add a sprinkle of cinnamon on top before serving.
Toast for Extra Crispiness (Optional but Recommended)
For maximum crispiness, heat a skillet over medium-low heat and lightly toast the assembled sandwiches for 1-2 minutes per side until the bread is golden and the edges are crispy. This step elevates the texture and makes the sandwich feel like a restaurant-quality meal.
Serve immediately while the waffles are still warm and the cream cheese is soft. The contrast of crispy waffles, creamy avocado, savory bacon, and sweet maple syrup makes every bite a perfect balance of textures and flavors. These sandwiches are hearty enough for breakfast but fun enough for a weekend brunch!
Pro Tips For Making Sweet Potato Waffle Sandwich
- ROAST THE POTATOES FIRST: I learned this the hard way—skipping the oven step means your waffles turn out dense and gluey. Roast the sweet potatoes at 400°F (200°C) for 25-30 minutes, cut-side down, until they’re tender enough to mash with a fork. This dry-roasting concentrates their natural sweetness and makes the waffles light, not soggy.
- USE COLD EGGS AND FLOUR: Whisk the eggs cold straight from the fridge—this keeps the waffle structure crisp instead of rubbery. Then, toss in the flour last and mix just until combined. Overmixing develops gluten, and your waffles will end up chewy. Think "lumpy but moist," not "smooth like pancakes."
- WATCH THE WAFLLE IRON: High heat at first, then lower. Start the waffles on medium-high to get a golden crust, but drop the heat to medium after 2 minutes or they’ll burn before cooking through. A slightly uneven color is fine—just check the center with a toothpick. (Yes, even if you’re impatient like me.)
- SWAP SUGAR FOR MAPLE: Skip the granulated sugar and replace half with pure maple syrup instead. The waffles stay moist longer, and the flavor deepens without needing extra cinnamon. If you’re lazy, use 1:1 honey—just don’t overdo it, or your waffles’ll taste like dessert.
Serving suggestions for this recipe
Breakfast or Brunch
These waffle sandwiches are perfect for a hearty breakfast when paired with a side of fresh fruit like sliced apples or berries. The sweetness of the waffles complements the tartness of berries beautifully, while crispy bacon adds a savory touch.
For brunch, serve with a tall glass of cold milk or a spiced chai latte to balance the flavors. 🍏
Lunch on the Go
Pack these sandwiches in a bento box with individual portions of toppings for an easy, portable lunch. The crispy edges hold up well when wrapped in parchment paper, making them ideal for office lunches or picnics.
I like to include a small container of maple syrup for drizzling on the spot.
Dessert Twist
For a sweet dessert version, skip the bacon and avocado, and add whipped cream and chocolate chips between the waffles. Drizzle with warm caramel sauce and serve with a scoop of vanilla ice cream. This makes a fun, unexpected dessert that still feels like a comforting treat.
Dinner Party Plating
Elevate your next dinner party by presenting these sandwiches on a wooden board with small bowls of toppings for guests to customize. Add a side of roasted Brussels sprouts or a simple salad to round out the meal.
The contrast of warm, spiced waffles with cool, fresh greens makes for a memorable dish. ✨
Kid-Friendly Meal
Kids love these sandwiches because they're fun to eat and packed with familiar flavors. Let them assemble their own with toppings like turkey slices or extra maple syrup. The crispy edges make them exciting, while the sweet potato adds natural sweetness without refined sugar.
Meal Prep Hack
Prep the waffles and toppings ahead of time, then assemble sandwiches fresh when ready to eat. Store waffles in an airtight container in the fridge for up to 3 days, and keep toppings in separate containers.
Reheat waffles in a toaster for 2-3 minutes to restore crispiness before assembling. This saves time and keeps everything fresh. 💡
Nutrition facts
Frequently asked questions
Can I make these waffles ahead of time?
Yes! Cook the waffles and store them in an airtight container at room temperature for up to 2 hours or refrigerate for 3 days. To restore crispiness, reheat in a toaster or air fryer for 2-3 minutes before assembling. The secret is keeping them dry—never stack them without parchment paper in between.
What if my waffles turn out too dense?
Too dense usually means the batter was too thick or the waffle iron wasn't hot enough. For crispier results, make sure your iron is preheated to 350°F and don't overfill it—½ cup batter per section is perfect. If the batter seems stiff, whisk in 1 tablespoon milk or water to lighten it before cooking.
Can I make this recipe vegan? Use flax eggs (1 tbsp ground flax + 3 tbsp water per egg), vegan butter, and plant-based cream cheese. For extra crispiness, brush the waffle iron with coconut oil instead of butter. The flavor stays rich and satisfying—just
How do I prevent the sandwich from falling apart?
The key is proper assembly! Spread the cream cheese generously on the bread and press the waffles firmly together. For extra hold, lightly toast the assembled sandwich in a skillet for 1-2 minutes per side—this melts the cream cheese slightly and creates a seal. If using avocado, add it last so it doesn't get soggy from the heat.
What's the best bread to use?
Thick-cut sourdough is ideal because it holds up to the waffles and adds a tangy contrast. But any sturdy bread works—even brioche for a richer flavor. Avoid soft breads like white sandwich bread, as they'll get soggy from the cream cheese. For gluten-free, use a high-quality GF bread that can handle the moisture.