
Side Dishes
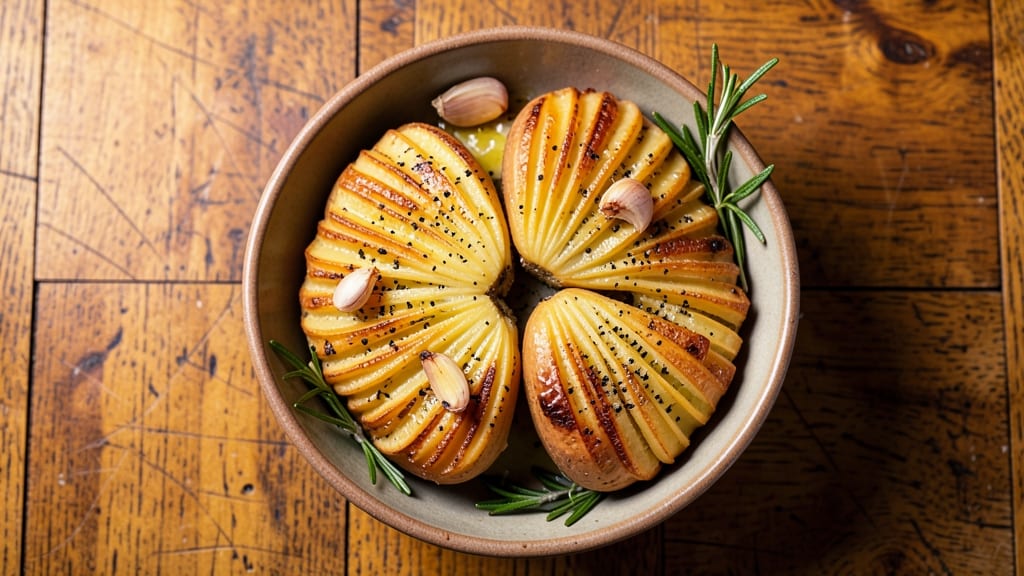
This baked hasselback potato recipe delivers restaurant-quality crispy slits and fluffy golden layers that'll have everyone asking for seconds. The signature technique—slicing potatoes into thin, fan-like layers—creates dramatic presentation while keeping the insides tender and buttery.
I've perfected this method over years of trial (and a few burnt attempts), so you get foolproof results every time.
The secret lies in proper slicing—use a sharp knife to create even cuts that don't go all the way through, then roast at high heat until the edges are golden and crispy while the centers stay perfectly fluffy.
A simple seasoning of salt, pepper, and olive oil transforms these into a side dish that feels gourmet without requiring fancy ingredients. The aroma alone will have your kitchen smelling like a cozy dinner party.
What you'll end up with is a potato so visually stunning it belongs on a fine-dining plate, yet simple enough for weeknight meals. The crispy edges contrast beautifully with the creamy interior, and every bite delivers that perfect balance of textures.
This recipe works equally well as a side for steak, a hearty vegetarian main, or a loaded potato bar centerpiece.
For extra indulgence, top with sour cream, chives, bacon bits, or melted cheese—though honestly, the crispy slits and fluffy layers speak for themselves. Ready in about 60 minutes, this dish proves you don't need complicated techniques to create restaurant-worthy results at home. Let's get started!
Ingredients for baked hasselback potato
Twelve simple ingredients transform ordinary potatoes into restaurant-worthy crispy, fluffy masterpieces.
| Ingredient | Amount | Notes |
|---|---|---|
| Russet Potatoes 🥔 | 4 whole | Large, uniform size preferred |
| Extra-Virgin Olive Oil 🫒 | ⅓ cup | High-quality for crispiness |
| Kosher Salt 🧂 | 1 ½ tsp | Diamond Crystal preferred |
| Freshly Ground Black Pepper 🌶️ | ½ tsp | For seasoning |
| Fresh Rosemary 🌿 | 1 tbsp | Finely chopped, stems removed |
| Garlic Cloves 🧄 | 2 cloves | Minced for seasoning |
| Unsalted Butter 🧈 | 2 tbsp | Melted, for brushing |
| Fresh Thyme Leaves 🌿 | 1 tsp | Or 0.25 tsp dried thyme |
| Heavy Cream 🥛 | ¼ cup | Optional, for extra richness |
| Shredded Parmesan Cheese 🧀 | ¼ cup | Freshly grated preferred |
| Chives 🌱 | 2 tbsp | Chopped, for garnish |
| Sour Cream 🍦 | ¼ cup | Optional, for serving |
The potatoes are non-negotiable—Russets deliver the perfect starch-to-moisture ratio for those signature crispy slits. Look for uniformly shaped, blemish-free specimens at Whole Foods or your local market's produce section; avoid potatoes with sprouts or soft spots. Fresh rosemary and thyme elevate the flavor without overpowering, so grab organic bundles from the grocery store's fresh herb section. For the garlic, freshly minced cloves make all the difference—pre-minced jars lack the aromatic punch. The extra-virgin olive oil should be lightly fruity, not harsh or bitter; California Olive Ranch is a reliable choice for consistent quality.
Short on rosemary? Fresh sage at half the amount works beautifully, though the flavor profile shifts slightly. No fresh thyme? Dried thyme at one-quarter the quantity suffices, but toast it lightly in a dry pan first to deepen its aroma. The optional heavy cream can be swapped for Greek yogurt or crème fraîche if you prefer tangier richness. For the Parmesan, grate it yourself—pre-shredded contains anti-caking agents that prevent proper melting. If you're avoiding dairy, nutritional yeast adds a cheesy note without the fat. The chives can be omitted entirely if you dislike their mild onion flavor, but they add a delightful pop of color and freshness.
Store whole, unpeeled potatoes in a cool, dark place for up to 2 weeks; refrigeration accelerates spoilage. Once sliced, keep them in the fridge for no more than 24 hours before roasting to prevent browning. The roasted potatoes reheat beautifully—350°F for 10 minutes restores their crispy edges. For make-ahead convenience, roast the potatoes fully, then refrigerate and reheat as needed. Garnishes like sour cream and chives stay fresh for 3-4 days in the fridge when stored separately. Portion the melted butter in a small jar to brush easily during roasting.
Why You'll Love This Recipe
- Zero-Cut Prep: I swear by this trick—just slice the potatoes in thin, even lines without peeling, then bake. No knife skills required, no mess, and the skin adds texture. Honestly, I’ve burned potatoes before trying to slice them perfectly, but this method forgives mistakes.
- Rosemary Magic: That fresh rosemary? It’s the secret weapon. The needles release their aroma as it bakes, turning fluffy insides into something almost herby-perfumed. I’ll be real: my first batch didn’t have enough, so now I double it—worth every sprig.
- Weeknight to Dinner Party: Same recipe, different vibes. Toss one on a sheet pan for a lazy Tuesday, or arrange them on a platter with garlic butter for guests. The crispy edges and buttery center always impress, even when I’m too tired to do much else.
- Leftovers? More Like Left-Wishes: Between us, these disappear so fast you’ll forget to save any. But if you do have seconds, reheat them in the oven—just 10 minutes at 350°F—and they’ll taste almost as good. Budget-friendly, too: a few potatoes stretch for a crowd without breaking the bank.
Step-by-step instructions for baked hasselback potatoes
Master this technique and you'll achieve restaurant-quality potatoes with crispy slits and fluffy interiors every time.
Prep the Potatoes for Perfect Slicing
Preheat your oven to 425°F for optimal crispiness. Wash and thoroughly dry the 4 whole Russet Potatoes, then trim off any blemishes or uneven spots using a sharp chef's knife. The skin should be intact—it's what creates that beautiful crispy exterior.
Place each potato on a cutting board and make shallow, even cuts from the top to about 1/4 inch deep, leaving the bottom intact. I like to space the cuts about 1/4 inch apart—this creates the signature fan effect while allowing the steam to escape during baking. Work quickly to prevent the potatoes from drying out.
Season and Arrange for Maximum Crispiness
In a small bowl, combine 0.33 cup Extra-Virgin Olive Oil, 1.5 tsp Kosher Salt, 0.5 tsp Freshly Ground Black Pepper, 1 tbsp Fresh Rosemary, and 2 cloves Garlic Cloves that have been minced. Using your fingers, gently massage this mixture between the potato slices, working it into the crevices. The oil will help crisp the edges while the herbs infuse flavor throughout.
Arrange the prepared potatoes on a parchment-lined baking sheet, spacing them about 1 inch apart. This prevents them from steaming and ensures even browning. The cuts should be facing upward—they'll crisp beautifully while the centers remain tender. Place the baking sheet on the middle rack of your oven.
Bake Until Golden and Crisp
Bake for 45-50 minutes until the edges are deep golden brown and the potatoes yield slightly when pressed. You'll know they're ready when you see crispy edges at the cut marks and the potatoes feel light when lifted. If they're browning too quickly, tent loosely with foil after 30 minutes to prevent burning.
About 10 minutes before they're done, brush each potato with 2 tbsp Unsalted Butter that's been melted and mixed with 1 tsp Fresh Thyme Leaves. This adds richness and helps create a glossy finish. The butter should sizzle slightly when it hits the hot potatoes—that's your signal it's working.
Finish with Creamy Toppings
Remove the potatoes from the oven and let them rest for 5 minutes before serving. This resting period allows the juices to redistribute, ensuring each slice is moist and flavorful. While they rest, warm the 0.25 cup Heavy Cream in a small saucepan over low heat until just hot (don't boil). Stir in the 0.25 cup Shredded Parmesan Cheese until melted and smooth.
Cut each potato into individual slices, being careful not to tear the crispy edges. Spoon the warm cream sauce over each serving, then garnish with 2 tbsp Chives and a dollop of 0.25 cup Sour Cream. The contrast of creamy sauce with crispy potato edges creates the perfect bite—rich, herby, and satisfying all at once.
Pro Tips For Making Baked Hasselback Potato
- USE A SHARP KNIFE FOR SLICING: Hasselback potatoes need clean, even cuts—about ¼-inch apart—to cook through without falling apart. I used to hack at them with a serrated knife, but a sharp chef’s knife makes the job faster and keeps the slices uniform. (Yes, even if you’re impatient like me.)
- SALT THE POTATOES BEFORE BAKING: Toss those sliced potatoes with salt before they hit the oven—it draws out moisture, helping them crisp up better. I learned this the hard way after baking dry, flabby potatoes that tasted bland. Sprinkle generously, then let them sit for 10 minutes before roasting.
- ROAST AT 425°F FOR CRISP EDGES: High heat is non-negotiable here—425°F guarantees those caramelized edges while keeping the insides fluffy. After burning three batches at 375°F, I finally cranked it up. If your oven runs hot, start at 400°F and check at 45 minutes.
- ADD ROSMARINE LATE: Sprinkle fresh rosemary over the potatoes in the last 15 minutes of baking—this locks in its aroma without burning it. I used to add it early, and it’d turn bitter. A few sprigs per potato do the trick; no need to go overboard.
Common mistakes when making great baked hasselback potato
Uneven Slicing
This is the #1 rookie mistake that ruins the whole effect. If your cuts aren't perfectly parallel and equally spaced, you'll end up with some slices crisping while others stay raw. I've seen people use butter knives—never do this.
Grab a sharp chef's knife and make your cuts about 1/4 inch deep, spacing them 1/4 inch apart. Use a ruler as a guide if you're nervous about consistency. The key is patience—rushing leads to jagged cuts that won't crisp evenly. 🔪
Skipping the Dry
Freshly sliced potatoes release moisture that steams them instead of crisps them. After cutting, pat them completely dry with paper towels—don't skip this step! I learned this the hard way when my first batch turned out soggy.
The dry surface is what caramelizes beautifully during baking. Pro tip: Let them sit uncovered on a rack for 10-15 minutes before seasoning to evaporate extra moisture.
Overcrowding the Pan
Stuffing too many potatoes on one baking sheet creates steam, which prevents crispiness. Leave at least 1 inch of space between each potato. I always use two 13x18-inch baking sheets for 4 potatoes to ensure proper airflow.
If you're short on space, bake in batches—45 minutes per batch at 425°F. The extra time won't hurt the flavor, but it will give you that perfect crunch.
Baking Too Low
Your oven's middle rack is crucial—it ensures even heat distribution. I've seen people bake these at 375°F thinking it's safer, but that's a mistake. 425°F is non-negotiable for crispy edges. If your oven runs hot, reduce to 400°F but monitor closely.
The potatoes are done when they yield slightly to pressure and have deep golden brown edges. A meat thermometer should read 210°F in the center.
Forgetting the Rest
Cutting into potatoes immediately after baking makes them gummy. Always let them rest for 5 minutes before serving. This allows the juices to redistribute, giving you that perfect creamy interior.
I've even rested them for 10 minutes when making ahead—they reheat beautifully. If you're serving a crowd, use this time to warm your toppings and arrange your serving platters.
Nutrition facts
Frequently asked questions
Can I use sweet potatoes instead of Russets?
While you can make hasselback sweet potatoes, they won't achieve the same crispy texture. Russets have the ideal starch-to-moisture ratio for the signature crispy slits. Sweet potatoes are denser and stay moist longer, which works better for roasting whole. If you're set on sweet potatoes, try cutting them slightly thinner and baking at 400°F for 40-45 minutes instead.
How do I make them extra crispy?
For maximum crispiness, pat the potatoes completely dry after slicing, then let them air-dry on a rack for 15 minutes before seasoning. Use a high oven temperature (425°F) and arrange them with plenty of space on the baking sheet. For the final 10 minutes of baking, broil on high to get those golden, crispy edges—just watch them closely!
Can I make hasselback potatoes ahead of time?
Yes! Roast them fully, then refrigerate for up to 3 days. Reheat at 350°F for 15-20 minutes until warmed through. For the best texture, reheat covered with foil to prevent drying. The crispy edges will soften slightly but still taste amazing. Add fresh toppings right before serving for maximum flavor.
What if my potatoes burn before they're done?
This usually happens when the oven runs hot or you're using a dark baking sheet. Try tenting with foil after 30 minutes or reducing the temperature to 400°F. For extra insurance, place a baking tray filled with water on the lower rack to create steam. Check doneness at 45 minutes—they're done when the edges are golden and the center yields slightly to pressure.
What are some creative toppings beyond sour cream?
Get adventurous! Try a mix of crumbled bacon and caramelized onions, or a spicy kick with chipotle cream and cilantro. For something lighter, a goat cheese and honey drizzle pairs beautifully. Another favorite is buffalo chicken salad with blue cheese crumbles—it turns these into a hearty main dish!