
Side Dishes
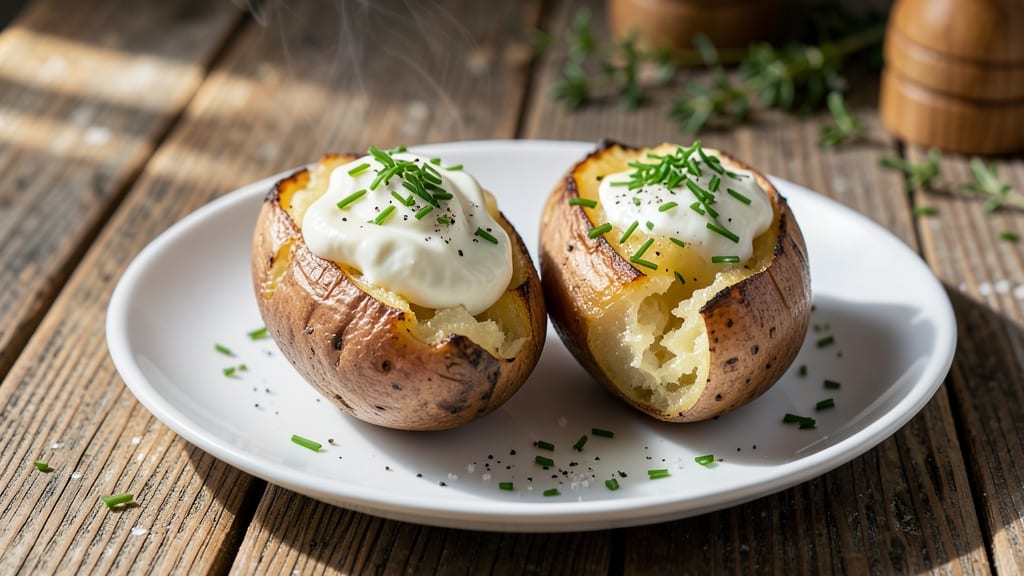
This baked potato with sour cream and chives recipe transforms a simple side into a creamy, restaurant-worthy dish that takes just 60 minutes from start to finish.
The secret lies in perfectly baked potatoes with fluffy interiors and crispy skins, topped with a velvety sour cream-chive mixture that adds vibrant color and tangy brightness. I’ve perfected this method over years of testing—no soggy toppings or undercooked centers here.
What makes this recipe stand out is the balance of textures: the buttery, tender potato contrasts beautifully with the cool, herby sour cream that melts into every bite. The chives add a fresh pop of green, turning this into a visually stunning dish that’s as impressive as it is delicious.
No fancy techniques required—just a few simple steps and high-quality ingredients. The result is a dish that’s foolproof yet feels special enough for dinner parties or cozy weeknight meals.
The sour cream topping stays creamy without curdling, and the chives add just the right amount of freshness to cut through the richness. It’s the kind of side dish that makes everyone ask for seconds. Serve with your favorite protein or enjoy as a hearty vegetarian meal.
Here’s how to make it perfectly every time.
Ingredients for baked potato with sour cream and chives
Four creamy potatoes, two vibrant toppings—elevate your side dish effortlessly with this restaurant-worthy combo.
| Ingredient | Amount | Notes |
|---|---|---|
| Russet Potatoes 🥔 | 4 whole | Large, evenly sized for even baking |
| Unsalted Butter 🧈 | ½ cup | Melted for brushing, full-fat preferred |
| Salt 🧂 | 2 tsp | Diamond Crystal kosher, for seasoning |
| Black Pepper 🌶️ | ½ tsp | Freshly ground for best flavor |
| Sour Cream 🥛 | 1 cup | Full-fat, room temperature for blending |
| Fresh Chives 🌿 | ¼ cup | Finely chopped, vibrant green preferred |
| Garlic Cloves 🧄 | 2 cloves | Minced for subtle depth of flavor |
| Green Onion 🧅 | 2 whole | Thinly sliced, for garnish and color |
| Heavy Cream 🥛 | ¼ cup | Optional, for extra creaminess |
| Dried Dill 🌿 | ½ tsp | Or 1 tsp fresh dill, for herby note |
| Lemon Juice 🍋 | 1 tbsp | Freshly squeezed, for brightness |
| Chives 🌿 | ⅛ cup | Extra for garnish, store-bought works |
The potatoes are the foundation, so Russet potatoes are non-negotiable—they bake up fluffy and hold their shape. Grab the largest ones you can find (4-6 oz each) at Whole Foods or your local market's produce section, where they're usually pre-washed for convenience. If they're small, they'll dry out faster. The butter matters too—unsalted, full-fat butter gives the skins that golden, crispy finish. I always buy a tub of Plugrá brand when I'm doing a big batch, but store-brand works just fine. Pro tip: Pat them dry before baking—extra moisture = soggy skins.
Sour cream is the star here, but not all brands play nice. Full-fat, plain sour cream (like Breakstone's or Kroger's) stays thick and creamy when blended. If yours is too thin, strain it through a fine-mesh sieve to remove excess liquid. Fresh chives are ideal, but dried chives at half the amount work in a pinch (though they lack that bright pop of color). No chives? Green onion or parsley gives a similar freshness. The garlic is subtle but essential—roasted garlic adds sweetness, but raw minced keeps it classic. And that extra cup of chives for garnish? Don't skip it—it turns this from 'good' to 'wow' in seconds.
Potatoes keep 3-4 days in the fridge once baked—reheat in the oven at 375°F for 10 minutes to restore crispiness. The sour cream topping? Make it ahead and store in an airtight container for up to 3 days, but add fresh chives right before serving. For meal prep, bake the potatoes, cool completely, then refrigerate. Reheat in the microwave for 2 minutes—they'll be slightly softer but still delicious. Garnish with extra chives right before serving to keep that vibrant green color. And if you're making this for a crowd? Double the batch—it disappears fast.
Why You'll Love This Recipe
- No-Fuss Potato Night: I swear, this is the kind of meal where you can set it and forget it—just pierce those Russets, rub them with butter and salt, and let the oven do the work while you sip your coffee. The only real effort is the good kind: scooping out that fluffy center later.
- Creamy Crispy Magic: That buttery skin cracking open? Pure satisfaction. Then you get to fold in tangy sour cream and bright chives, and suddenly you’ve got a texture game—crisp outside, pillowy inside, with a cool, herby bite that makes it feel fancy without trying.
- Game for Any Meal: Honestly, this works for everything: a lazy Sunday brunch, a quick lunch after a workout, or even a cozy dinner when you’re too tired to plan. Add bacon bits for protein, or keep it simple—either way, it’s always a crowd-pleaser.
- Budget Buster: Russets are cheap, butter is cheap, and sour cream stretches further than you’d think. Between us, I’ve fed four people for under $10 with this, and they all asked for seconds. That’s a win for my wallet and my taste buds.
Step-by-step instructions for creamy baked potatoes with herbed topping
Here's how to bake fluffy potatoes and make that signature creamy-green topping.
Prep and Bake the Potatoes
Preheat your oven to 400°F and position racks in the lower and upper third positions. Scrub the 4 whole Russet Potatoes thoroughly under cold water to remove any dirt, then prick each potato all over with a fork—this prevents them from bursting while baking.
Rub each potato generously with 0.25 cup of the melted unsalted butter (reserve the remaining 0.25 cup for later), then sprinkle with 1 teaspoon salt and 0.25 teaspoon black pepper on all sides. Place them directly on the oven racks, not in a pan, for maximum crispiness. Bake for 45-50 minutes, rotating halfway through, until a knife slides in easily and the skin is deep golden brown.
Prepare the Creamy Topping Base
While the potatoes bake, mix the 1 cup sour cream, 0.25 cup heavy cream, 0.5 teaspoon dried dill, 1 tablespoon lemon juice, and 2 teaspoons salt in a medium bowl. Stir until completely smooth—this ensures a velvety texture. The lemon juice brightens the flavors while the dill adds a subtle herbal note that pairs perfectly with the richness.
In a separate small bowl, finely chop the 0.25 cup fresh chives and 2 cloves garlic cloves into a paste using a knife or food processor. Add this to the sour cream mixture and stir gently to combine. The garlic and chives should be evenly distributed but still visible for texture. Let this mixture sit at room temperature while you finish baking the potatoes.
Assemble and Garnish the Potatoes
Carefully transfer the baked potatoes to a cutting board and let them rest for 5 minutes—this allows the steam inside to redistribute, keeping them moist. Cut each potato open lengthwise and use a spoon to fluff the insides gently. Spoon about ¼ cup of the sour cream mixture onto each potato, spreading it evenly toward the edges.
Top each potato with 2 thinly sliced green onions and sprinkle with the remaining 0.125 cup chives and 0.25 teaspoon black pepper. The green onions add a fresh crunch, while the extra chives give a pop of color and herby flavor. For an extra touch, drizzle with any remaining melted butter from the potatoes.
Pro Tips For Making Baked Potato With Sour Cream And Chives
- Prick the Potatoes: I learned this the hard way—skipping the fork pricks leads to exploded potatoes in the oven. Poke each Russet 3-4 times with a fork before baking to let steam escape. (Yes, it looks odd, but your kitchen floor will thank you.)
- Use a Thermometer: Don’t guess at doneness. Russets feel done when they hit 205-210°F internally—any lower, they’ll taste undercooked; higher, they’ll dry out. I used to pull them too soon, then microwave them for 30 seconds. Waste of time.
- Salt the Butter Generously: Unsalted butter is your blank canvas, so don’t hold back. Mix in at least ½ teaspoon salt per tablespoon of butter before spreading it on the potato. (Your taste buds will notice the difference, especially if you’re using full-fat sour cream.)
- Warm the Sour Cream: Cold sour cream on a hot potato? That’s a texture crime. Microwave the sour cream for 10-15 seconds before dolloping it on—it’ll blend into the potato’s heat instead of feeling like a dollop of fridge chill. (Trust me, it’s worth the 15 seconds.)
Pro cooking tips for this dish
Butter Matters
Don’t skimp on the butter—it’s what creates that perfect crispy skin and buttery interior. I always use full-fat unsalted butter (like Plugrá or store-brand) because it melts beautifully and adds rich flavor. Melt ½ cup total and rub it generously over the potatoes before baking.
The key is to pat them completely dry first—any moisture left on the skin will steam instead of crisp. 🧈
Oven Rack Placement
Baking potatoes directly on the oven rack (not in a pan) creates maximum crispiness, but placement is everything. Position racks in the lower and upper thirds of the oven for even heat circulation.
This ensures the tops and bottoms brown evenly without burning. Rotate the potatoes halfway through baking (after 25 minutes) for consistent browning. 🔥
Sour Cream Secrets
Room-temperature sour cream blends smoother and stays thicker. If yours is too cold, let it sit at room temperature for 10-15 minutes before mixing. For extra creaminess, add ¼ cup heavy cream to the sour cream mixture.
Strain it through a fine-mesh sieve if it’s too thin—this removes excess liquid that can make the topping watery. 🥛
Chive Chopping Technique
Finely chop the chives into a paste-like consistency using a knife or food processor. This ensures they distribute evenly in the sour cream without clumping. For garnish, use thinly sliced green onions and extra chives—this adds freshness and visual appeal.
Pro tip: Pulse the chives in short bursts to avoid over-chopping into mush. 🌿
Resting Time
Never skip the 5-minute rest after baking! This allows the steam inside to redistribute, keeping the potatoes moist. Cut them open while still warm, then fluff the insides gently with a spoon.
Spoon the sour cream mixture toward the edges to prevent sogginess. The contrast of warm potato and cool topping is what makes this dish irresistible. ⏱️
Make-Ahead Topping
Prepare the sour cream topping ahead of time and store it in an airtight container for up to 3 days. Add fresh chives right before serving to keep their vibrant color and crisp texture.
For meal prep, bake the potatoes, cool completely, then refrigerate. Reheat in the oven at 375°F for 10 minutes to restore crispiness—microwaving makes them gummy. 📅
Nutrition facts
Frequently asked questions
Can I use sweet potatoes instead of Russet potatoes?
Sweet potatoes will work, but the texture and flavor will differ significantly. Russet potatoes have a higher starch content that creates that signature fluffy interior. Sweet potatoes stay denser and slightly sweeter, which may not pair as well with the tangy sour cream topping. If you must use them, bake at 375°F for 60-75 minutes until tender, and expect a less crispy skin.
How do I keep the sour cream topping from getting watery?
Use room-temperature sour cream (not cold) and strain it through a fine-mesh sieve if it's too thin. Adding ¼ cup heavy cream also helps stabilize the texture. For extra insurance, chill the mixture for 30 minutes before serving. The key is working with properly thickened sour cream from the start.
Can I make this dish ahead of time?
Bake the potatoes up to 2 days ahead and store them at room temperature. For the topping, prepare it 1 day ahead and refrigerate in an airtight container. Reheat the potatoes in the oven at 375°F for 10 minutes before adding fresh topping and garnishes. This keeps everything crisp and vibrant.
What if I don't have fresh chives?
Use green onions or parsley as substitutes. For a similar flavor, try ½ teaspoon dried chives (though it won't provide the same vibrant color). If using green onions, slice them thinly for garnish. The dish will still taste delicious—just with a slightly different freshness profile.
Why did my potato skins turn out soggy?
Soggy skins usually happen from steam buildup. Always bake potatoes directly on oven racks (not in pans) and pat them completely dry before seasoning. If using foil, poke holes in it to allow steam to escape. Also, avoid overcrowding the oven—leave space between potatoes for proper air circulation.