
Side Dishes
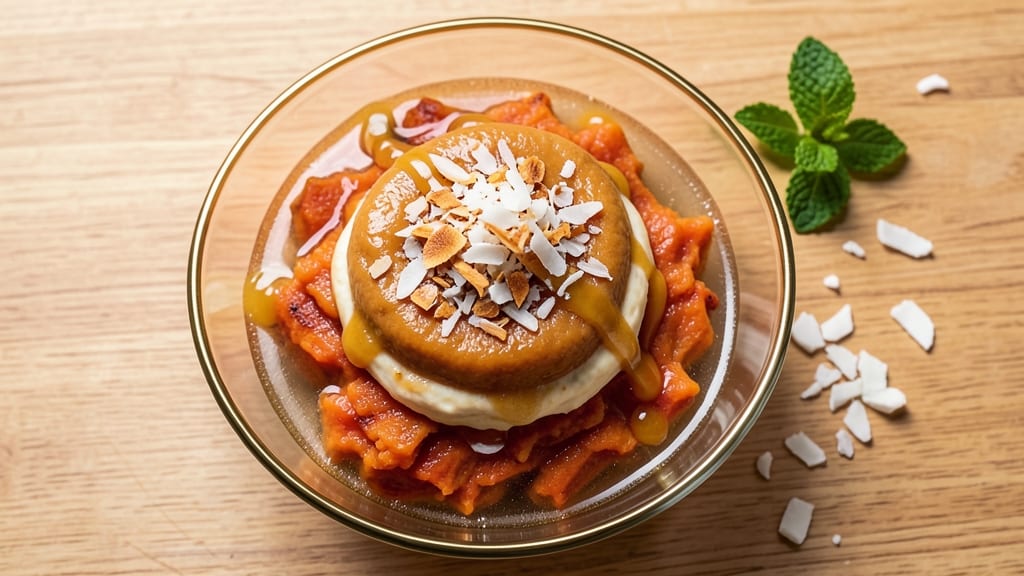
This sweet potato haupia recipe transforms humble orange roots into a velvety coconut dessert with layers of texture and tradition. The fusion of Polynesian haupia (coconut milk pudding) and sweet potato creates a dessert that's both comforting and elegant, with a silky center and crisp toasted coconut topping.
What makes this recipe special is the balance between rustic sweet potato flavor and the luxurious creaminess of coconut milk—perfect for special occasions or when you want to impress with minimal effort.
The process begins with roasting sweet potatoes until tender, then blending them into a smooth puree that forms the dessert's heart. Coconut milk is gently reduced to intensify its natural sweetness before being combined with the purée and a setting agent (traditional gelatin or agar-agar for vegan versions).
The result is a dessert that's rich, naturally sweet, and subtly spiced with vanilla—a far cry from store-bought versions that often taste artificial.
What you'll end up with is a dessert that looks as beautiful as it tastes: golden-hued layers of coconut velvet topped with caramelized toasted coconut flakes.
The contrast between the creamy interior and crunchy exterior makes every bite satisfying, while the natural sweetness of the sweet potatoes keeps it from being overly cloying. This recipe serves as both a nod to cultural traditions and a modern twist on classic desserts.
Whether you're preparing for a luau, family gathering, or simply craving something special, this sweet potato haupia delivers restaurant-quality results with homemade simplicity. The best part? It can be made ahead and tastes even better the next day as the flavors meld together.
Let's create this dessert that's sure to become a new favorite.
Ingredients for sweet potato haupia
Six ingredients transform humble sweet potatoes into a Polynesian-inspired coconut velvet dessert.
| Ingredient | Amount | Notes |
|---|---|---|
| Sweet Potatoes 🍠 | 2 lbs | Orange flesh, peeled and cubed |
| Full-Fat Coconut Milk 🥥 | 2 cans | 13.5 oz each, high quality |
| Granulated Sugar 🍚 | 1 cup | Adjust to taste for sweetness |
| Vanilla Extract 🌿 | 1 tbsp | Pure Madagascar preferred |
| Unflavored Gelatin 🍬 | 1 ½ tbsp | Or 2 tsp agar-agar for vegan |
| Unsweetened Coconut Flakes 🥥 | 1 cup | Toasted for crunchy topping |
| Toasted Coconut Oil 🫒 | 2 tbsp | For caramelizing coconut flakes |
| Ground Cinnamon 🌶️ | ½ tsp | Optional, for subtle warmth |
| Salt 🧂 | ¼ tsp | Fine sea salt for balance |
| Water 💧 | ½ cup | For gelatin hydration |
| Orange Zest 🍊 | 1 tbsp | Fresh, for bright aroma |
| Orange Juice 🍊 | ¼ cup | Freshly squeezed, optional |
The sweet potatoes are the star here—look for vibrant orange flesh, not pale or mealy ones. Trader Joe's and Whole Foods carry the best organic varieties, but any sweet potato works as long as it's firm and heavy for its size. For the coconut milk, full-fat canned versions (like Thai Kitchen) give the richest texture—skip the light versions. Toasting the coconut flakes is non-negotiable; they need to turn golden and crisp for that perfect crunch. Pro tip: spread them on a baking sheet and toast in 350°F oven for 8-10 minutes, stirring halfway.
No vanilla extract? Vanilla bean paste works too, or a splash of vanilla-infused coconut milk if you're feeling fancy. The gelatin can be swapped for agar-agar at double the amount for a vegan version—just remember it sets differently. Short on coconut flakes? Toasted macadamia nuts add a similar crunch. For the sugar, I use white granulated, but coconut sugar gives a caramel note that pairs beautifully. The orange zest and juice are optional but add a lovely brightness—use blood oranges if you want extra depth. If you're making this ahead, the gelatin version keeps for 3 days in the fridge, while agar-agar lasts 5 days.
This dessert tastes even better the next day as the flavors meld. Store in an airtight container with plastic wrap pressed directly on the surface to prevent a skin from forming. For serving, garnish with extra toasted coconut flakes and a sprinkle of cinnamon. The haupia can be made 2 days ahead—just let it come to room temperature before serving. Freezing isn't recommended as it alters the texture, but you can freeze portions of the coconut milk mixture separately for up to 3 months if you're prepping components ahead of time.
Why You'll Love This Recipe
- No Boil, No Peel: I just microwave the sweet potatoes whole—skin and all—until tender. The gelatin and coconut milk do all the heavy lifting while I sip my coffee. Honestly, less mess than making regular haupia, and the texture stays ridiculously smooth.
- Creamy Without the Guilt: That full-fat coconut milk? It’s the secret weapon—rich, velvety, and somehow makes the sugar taste like a treat, not a cheat. The vanilla ties it all together, but the sweet potato brings this dessert a warm, earthy depth that’s exactly what you need when you crave something familiar but fancy.
- Party in a Jar: This is my go-to for potlucks, birthdays, or just because. The gelatin sets it up perfectly for layering in glasses, and it keeps for days in the fridge. Between us, guests always ask for the recipe—and my kids sneak seconds when they think I’m not looking.
- Budget-Friendly Luxury: Sweet potatoes and canned coconut milk stretch this dessert further than store-bought haupia. I’ve made this for a crowd of 10 for under $15, and the leftovers? Still taste fresh three days later. It’s my secret weapon for feeding everyone without breaking the bank.
Step-by-step instructions for sweet potato haupia
Here's how to make this creamy, velvety haupia with sweet potato depth and coconut crunch.
Cook the Sweet Potatoes Until Silky
Peel and cube the 2 lbs sweet potatoes into ½-inch pieces for even cooking. In a medium saucepan, combine the sweet potatoes with 1 cup water and bring to a boil over medium-high heat. Once boiling, reduce heat to medium-low and simmer uncovered for 15-20 minutes until fork-tender.
Drain the sweet potatoes thoroughly and transfer them to a blender or food processor. Add 1 cup granulated sugar, 1 tbsp vanilla extract, 1 tbsp orange zest, and 0.25 cup orange juice. Blend until completely smooth, scraping down the sides as needed. The mixture should be velvety with no lumps—this ensures a silky texture in your haupia.
Bloom and Infuse the Gelatin
In a small bowl, sprinkle the 1.5 tbsp unflavored gelatin evenly over the 0.5 cup water to bloom. Let it sit for 5-7 minutes until it forms a gel-like consistency. This step is crucial—it prevents clumping and ensures even distribution in the haupia.
While the gelatin blooms, warm 1 can full-fat coconut milk in a saucepan over low heat until it reaches 110°F—just until it's steaming but not boiling. Remove from heat and whisk in the bloomed gelatin until fully dissolved. The mixture should turn translucent, indicating the gelatin has activated properly.
Combine and Set the Haupia Base
In a large mixing bowl, whisk together the sweet potato purée, warmed coconut milk-gelatin mixture, 0.25 tsp salt, and 0.5 tsp ground cinnamon until fully combined. The batter should be smooth and slightly thickened. Pour the mixture into a 6x6-inch baking dish or individual ramekins, covering the bottom evenly.
Refrigerate the haupia for 4-6 hours or until fully set. You'll know it's ready when the edges pull away from the dish and the center has a wobbly, jelly-like consistency. For best results, let it chill overnight—this deepens the flavors and creates that signature haupia texture.
Toast the Coconut Topping
Preheat your oven to 350°F. In a small skillet, melt the 2 tbsp toasted coconut oil over low heat. Add the 1 cup unsweetened coconut flakes and toast for 3-5 minutes, stirring constantly, until they turn a golden brown and release a nutty aroma. Remove from heat immediately to prevent burning.
Spread the toasted coconut flakes evenly over the set haupia just before serving. The warm coconut will contrast beautifully with the cool, creamy base. For extra flair, sprinkle with additional orange zest or a pinch of ground cinnamon to enhance the tropical flavors.
Serve and Enjoy
To serve, run a warm knife around the edges of the haupia dish to loosen it. Invert onto a serving plate and gently tap the bottom to release. Slice into squares or serve whole with the toasted coconut topping. The haupia should have a jiggly, custard-like texture with a silky mouthfeel and a perfect balance of sweet and citrusy notes. Enjoy chilled for the best experience!
Pro Tips For Making Sweet Potato Haupia
- Peel and Cube Small: Sweet potatoes hold moisture like a sponge, and big chunks mean uneven cooking. Cut them into ½-inch cubes—small enough to soften completely but not so tiny they turn to mush in the coconut milk.
- Simmer Coconut Milk Low: Full-fat coconut milk scalds easily, and burnt flavor ruins everything. Keep the heat at a gentle simmer—just enough to see tiny bubbles at the edges, not a rolling boil. I learned this the hard way after one batch tasted like coconut curry instead of haupia.
- Bloom Gelatin Cold: Dumping dry gelatin into hot liquid? That’s how you end up with lumps. Bloom it first in cold water for 5 minutes, then whisk it into the warm (not boiling) coconut mixture. Your haupia will set smoothly, not turn grainy.
- Strain the Purée: Sweet potato purée with skin bits or fibrous chunks makes for a rough texture. Strain it through a fine-mesh sieve after blending—yes, it’s extra work, but the result is silky, restaurant-quality haupia. (Your blender will hate you a little less too.)
Wine and beer pairings for sweet potato haupia
Tropical White Wine
A crisp Moscato d'Asti from Italy is my go-to pairing for this dessert—its light effervescence and hints of peach and apricot complement the sweet potato's natural caramel notes while cutting through the richness of the coconut. Serve chilled to highlight its refreshing acidity, which balances the haupia's velvety texture. 🍷
For a slightly bolder option, try a Viognier from California or New Zealand. The floral and stone fruit aromas in these wines mirror the dessert's citrus and vanilla undertones, creating a harmonious match. Look for a bottle with 12-13% ABV to avoid overpowering the delicate flavors.
Coconut-Inspired Beer
Craft a coconut milk stout at home or seek out a commercial version like Goose Island Coconut Stout—its creamy, toasty profile mirrors the haupia's coconut base while the dark malt adds depth. The beer's slight bitterness contrasts beautifully with the dessert's sweetness, creating a perfect balance. 🍺
For a lighter option, try a Belgian witbier with a splash of coconut cream added to the glass. The citrusy notes from coriander and orange peel in these beers enhance the haupia's orange zest, while the effervescence cleanses the palate between bites. Allagash White is a reliable choice.
Non-Alcoholic Pairings
For a refreshing non-alcoholic option, serve sparkling pineapple juice chilled over ice. The tropical fruit flavors amplify the haupia's citrus notes, while the bubbles create a luxurious mouthfeel. I like Dole Sparkling Pineapple Juice for its bright acidity and natural sweetness. 🍍
Another excellent choice is coconut water infused with muddled mint and lime. The natural sweetness and subtle mineral notes of the coconut water complement the dessert's creamy texture, while the mint adds a refreshing contrast. Serve in a tall glass with ice for an elegant presentation.
Coffee Contrast
If you're serving haupia after a meal, a small cup of Kona coffee with a touch of vanilla syrup creates an unexpected yet delightful pairing. The coffee's bright acidity and nutty notes cut through the dessert's sweetness, while the vanilla enhances the haupia's natural flavors. 💛
For a creamier option, try coconut milk chai latte made with steamed coconut milk, black tea, and a dash of cinnamon. The warm spices mirror the haupia's cinnamon and vanilla, creating a cohesive flavor experience that feels both comforting and sophisticated.
Nutrition facts
Frequently asked questions
Can I make this haupia without gelatin?
Yes! For a vegan version, replace the 1.5 tbsp gelatin with 2 tsp agar-agar powder dissolved in ½ cup water. Bring to a boil, then cool slightly before mixing into the coconut-sweet potato blend. Agar sets differently—it needs to cool completely to firm up, so plan for 6-8 hours of chilling time instead of 4-6. The texture will be slightly firmer but still creamy.
Why does my haupia look grainy?
Graininess usually means the sweet potato purée wasn't smooth enough or the gelatin wasn't fully dissolved. For silky results, blend the sweet potatoes until completely smooth with no visible chunks. When blooming gelatin, whisk it vigorously into warm (not hot) coconut milk until fully translucent. If it still looks grainy, strain the mixture through a fine-mesh sieve before pouring into molds.
How do I store leftovers?
Cover tightly with plastic wrap pressed directly on the surface to prevent a skin from forming. The gelatin version keeps well for 3 days in the fridge, while agar-agar versions last 5 days. For longer storage, freeze individual portions in airtight containers for up to 1 month—thaw overnight in the fridge before serving. The texture may soften slightly after freezing, but it's still delicious!
Can I add other flavors to this recipe?
For a tropical twist, add ½ tsp lime zest or 1 tsp passionfruit purée to the sweet potato purée. For warmth, boost the cinnamon to 1 tsp or add ¼ tsp nutmeg. Just be mindful of balancing flavors—start with small amounts and adjust to taste. The key is keeping the coconut and sweet potato as the stars of the show.
Is this haupia gluten-free?
Yes, this recipe is naturally gluten-free! All ingredients—sweet potatoes, coconut milk, gelatin/agar-agar, sugar, and coconut flakes—are gluten-free. Just double-check your gelatin brand if you're sensitive, as some may contain additives. For extra safety, use a dedicated blender and utensils if you're also handling gluten-containing foods in your kitchen.